# 远程过程调用框架gRPC入门及Java示例代码
# 前言
之前在《Protobuf入门与使用示例,高性能的序列化框架 (opens new window)》这篇文章中,我们介绍了Protobuf的概念,以前如何在Java中通过Protobuf序列化和反序列化对象。Protobuf的一个重要应用场景就是gPRC (opens new window),它是一个开源的、高性能的远程过程调用(RPC,Remote Procedure Call)框架。gPRC支持多种语言,如Java、C++、Python等。
本文通过一步步,从proto文件编写到整合服务端和客户端,给出gPRC在Java中的应用,以方便大家理解。
# 2 编写及编译proto文件
# 2.1 编写proto文件
本文的事例是一个订单系统,所以我们编写proto文件来描述一个订单服务OrderService,内容如下:
syntax = "proto3";
option java_multiple_files = true;
option java_package = "com.pkslow.grpc.gen";

message OrderRequest {
  int32 orderId = 1;
}

message OrderRespone {
  int32 orderId = 1;
  int32 price = 2;
  string name = 3;
}

service OrderService {
  rpc getOrder(OrderRequest) returns (OrderRespone);
}
与之前的介绍没有太大差别,就是增加了一个service的定义,我们声明了一个方法getOrder,入参为一个消息OrderRequest,返回为OrderRespone。即通过订单ID来查询订单信息,很好理解。
# 2.2 编译生成Java类
因为增加了gPRC的内容,需要下载生成gPRC相关Java代码的插件,可以到Maven仓库 (opens new window)下载,这里下载的是目前最新版本1.32.1,根据自己的系统下载。我这里下载的是protoc-gen-grpc-java-1.32.1-osx-x86_64.exe (opens new window),下载完成后放在之前proto的目录:/Users/larry/Software/protobuf。
我们需要对它赋权,给可执行权限:
$ chmod u+x protoc-gen-grpc-java-1.32.1-osx-x86_64.exe
不然可能会遇到下面问题:
program not found or is not executable
Please specify a program using absolute path or make sure the program is available in your PATH system variable
--grpc-java_out: protoc-gen-grpc-java: Plugin failed with status code 1.
接着就可以编译了,命令如下:
PATH_TO_PLUGIN=/Users/larry/Software/protobuf/protoc-gen-grpc-java-1.32.1-osx-x86_64.exe
SRC_DIR=./src/main/grpc
DST_DIR=./src/main/java
protoc --plugin=protoc-gen-grpc-java=$PATH_TO_PLUGIN -I=$SRC_DIR --java_out=$DST_DIR --grpc-java_out=$DST_DIR $SRC_DIR/OrderService.proto
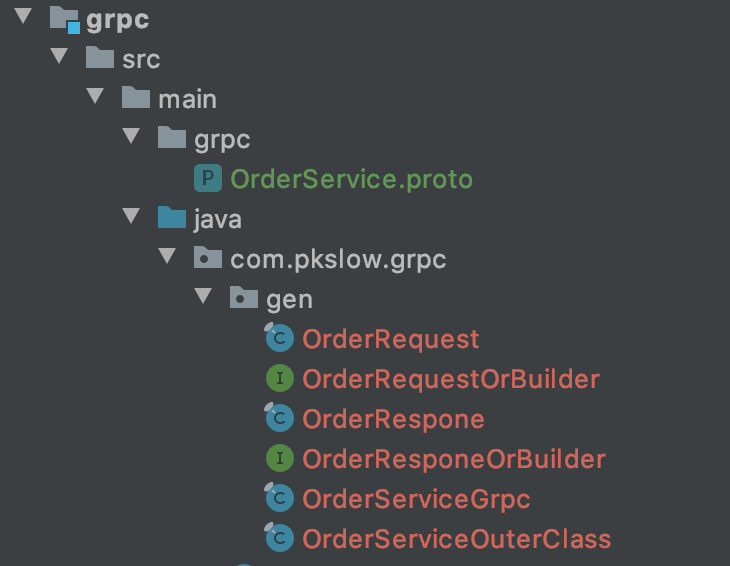
执行完成就会生成以下文件(红色部分):

# 3 整合gRPC到Java中
现在相关的Java类已经生成了,我们需要编写服务端和客户端,把这些代码整合进来。
# 3.1 服务端Server
# 3.1.1 实现自定义的Service类
我们要实现一个OrderServiceImpl类,来自定义地实现OrderService的方法getOrder,它的功能就是通过接受orderId,然后返回订单信息。实际项目中可能是查数据库然后返回结果,这些直接简化:
public class OrderServiceImpl extends OrderServiceGrpc.OrderServiceImplBase {
    @Override
    public void getOrder(com.pkslow.grpc.gen.OrderRequest request,
                         io.grpc.stub.StreamObserver<com.pkslow.grpc.gen.OrderRespone> responseObserver) {
        System.out.println("Request from Client: " + request);

        int orderId = request.getOrderId();

        OrderRespone respone = OrderRespone.newBuilder()
                .setOrderId(orderId)
                .setPrice(orderId + 100)
                .setName("Pumpkin" + orderId)
                .build();

        responseObserver.onNext(respone);
        responseObserver.onCompleted();
    }
}
# 3.1.2 开启服务
作为服务端,当然需要启动一个服务器来处理来自客户端的请求,这里端口为9999:
public class PkslowServer {
    public static void main(String[] args) {
        Server server = ServerBuilder.forPort(9999)
                .addService(new OrderServiceImpl())
                .build();

        try {
            System.out.println("Start server...");
            server.start();
            System.out.println("Started");
            server.awaitTermination();
        } catch (Exception e) {
            e.printStackTrace();
        }
    }
}
# 3.2 客户端Client
客户端就是把请求消息发给服务端,然后处理返回结果:
public class PkslowClient {
    public static void main(String[] args) {
        ManagedChannel channel = ManagedChannelBuilder.forAddress("localhost", 9999)
                .usePlaintext()
                .build();
        OrderServiceGrpc.OrderServiceBlockingStub stub = OrderServiceGrpc.newBlockingStub(channel);

        callWithOrderId(stub, 511);
        callWithOrderId(stub, 824);
        callWithOrderId(stub, 805);

        channel.shutdown();
    }

    private static void callWithOrderId(OrderServiceGrpc.OrderServiceBlockingStub stub, int orderId) {
        OrderRequest request = OrderRequest.newBuilder()
                .setOrderId(orderId)
                .build();
        OrderRespone respone = stub.getOrder(request);
        System.out.println("Respone from Server: " + respone);
    }
}
(1)连接服务端localhost:9999,与之建立通信;
(2)生成请求消息OrderRequest;
(3)调用并接收返回结果OrderRespone;
(4)处理返回结果OrderRespone,这里只是打印出来。
# 3.3 执行结果
先启动服务端,再执行客户端,两者日志输出如下:
服务端:
Start server...
Started
Request from Client: orderId: 511

Request from Client: orderId: 824

Request from Client: orderId: 805
客户端:
Respone from Server: orderId: 511
price: 611
name: "Pumpkin511"

Respone from Server: orderId: 824
price: 924
name: "Pumpkin824"

Respone from Server: orderId: 805
price: 905
name: "Pumpkin805"
# 4 maven生成代码
前面我们是通过命令行来生成Java相关类的,在实际项目中一般不会这样操作,而是通过maven插件,这样才方便CI/CD。
增加maven配置如下:
<build>
  <extensions>
    <extension>
      <groupId>kr.motd.maven</groupId>
      <artifactId>os-maven-plugin</artifactId>
      <version>${os-maven-plugin.version}</version>
    </extension>
  </extensions>
  <plugins>
    <plugin>
      <groupId>org.xolstice.maven.plugins</groupId>
      <artifactId>protobuf-maven-plugin</artifactId>
      <version>${protobuf-maven-plugin.version}</version>
      <configuration>
        <protocArtifact>com.google.protobuf:protoc:3.3.0:exe:${os.detected.classifier}</protocArtifact>
        <pluginId>grpc-java</pluginId>
        <pluginArtifact>io.grpc:protoc-gen-grpc-java:1.4.0:exe:${os.detected.classifier}</pluginArtifact>
      </configuration>
      <executions>
        <execution>
          <goals>
            <goal>compile</goal>
            <goal>compile-custom</goal>
          </goals>
        </execution>
      </executions>
    </plugin>
  </plugins>
</build>
此时,proto文件的目录名不能是src/main/grpc了,要更改为src/main/proto,这样maven执行时才能找得到。
同时,我们把代码拆成三个模块,让它更接近实际项目:
grpc-order-proto:proto文件模块,用来定义和生成相关类;
grpc-order-server:服务端模块;
grpc-order-client:客户端模块。
只要执行mvn clean install,就可以编译执行了。分别启动服务端和客户端,效果是一样的。
# 5 总结
本文通过代码一步一步讲解了gRPC的入门使用,项目的代码在:https://github.com/LarryDpk/pkslow-samples